In this month's meetup, I demonstrated a few "tricks and treats" that I've been tinkering with for use within the Jamf Toolkit in the future.
Including:
- Detecting TCC Settings
- Configuring Scripts with Profiles
- Encrypting Text and Files
- Leveraging the Keychain
If you've ever had to give an app permission to use the camera, microphone, screen recording, and more; you've encountered TCC ("Transparency, Consent and Control") in MacOS. Created back in 2012 with 10.8 (Mountain Lion), TCC makes sure that only the registered apps you permit have access to the resources they need and nothing more.
Traditionally, settings like this have been stored in "Property List" (plist) files and can be accessed with command line tools like "defaults read", PlistBuddy, or plutil. But plist files get read into when the app is loaded and saved out when the app closes. So for large amounts of data or things that need to change frequently, plist files are insufficient.
That's where sqlite3 comes in! SQLite databases are small, self-contained, and highly efficient. They can be read from and written to very quickly and can contain associations and data types that plists can't.
So it's not surprising that Apple uses sqlite3 for things like TCC access.
But there isn't just one database for TCC permissions? Like many macOS resources, there are multiple levels of overlapping settings, including, but not limited to:
- /Library/Application Support/com.apple.TCC/TCC.db
- /Users/[USERNAME]/Library/Application Support/com.apple.TCC/TCC.db
The /Library level includes things like:
- kTCCServiceAccessibility
- kTCCServiceDeveloperTool
- kTCCServiceListenEvent
- kTCCServicePostEvent
- kTCCServiceScreenCapture
- kTCCServiceSystemPolicyAllFiles
And the /Users level includes things like:
- kTCCServiceAddressBook
- kTCCServiceAppleEvents
- kTCCServiceBluetoothAlways
- kTCCServiceCalendar
- kTCCServiceCamera
- kTCCServiceFileProviderDomain
- kTCCServiceFocusStatus
- kTCCServiceLiverpool
- kTCCServiceMicrophone
- kTCCServicePhotos
- kTCCServiceReminders
- kTCCServiceSystemPolicyDesktopFolder
- kTCCServiceSystemPolicyDocumentsFolder
- kTCCServiceSystemPolicyDownloadsFolder
- kTCCServiceSystemPolicyNetworkVolumes
- kTCCServiceSystemPolicyRemovableVolumes
So if we want to see if our people have enabled given Zoom access to their microphone, we can use:
sqlite3 -separator ',' "/Users/[USERNAME]/Library/Application Support/com.apple.TCC/TCC.db" "select service from access where service like '%microphone%' and client like '%zoom%'"; Or to check if Teams has access to screen sharing:
sqlite3 -separator ',' "/Library/Application Support/com.apple.TCC/TCC.db" "select service from access where service like '%screen%' and client like '%teams%'"; And if you needed to do a lot of this in a script, you could write some code like this:
USERNAME=$([[ $3 ]] && echo "$3" || defaults read /Library/Preferences/com.apple.loginwindow.plist lastUserName)

###
### Functions
###
function checkAccess() {
	service=$1
	app=$2

	## Determine which database we need
	case ${service} in
		## Screen recording is handled at the /Library layer
		'screen')
			db="/Library/Application Support/com.apple.TCC/TCC.db"
		;;

		## Microphone and camera are handled at the /User/Library layer
		'microphone' | 'camera')
			db="/Users/${USERNAME}/Library/Application Support/com.apple.TCC/TCC.db"
		;;
	esac

	## Read the sqlite database
	access=$(sqlite3 \
		-separator ',' \
		"${db}" \
		"select client,service,auth_value from access where service like '%${service}%' and client like '%${app}%'"; \
	)

	## Send back "On" or "Off"
	[[ ${access: -1}  -gt 0 ]] && echo "On" || echo "Off"
}

if [[ $(checkAccess "camera" "zoom") == "Off" ]]; then
  echo "The camera is not enabled for Zoom"
fiRunning Scripts in a Jamf Policy allows one to configure up to eight different aspects of your script with Parameters. Parameters one through three are reserved for computer name, mount point, and the username of the current user respectively. But parameters four through eleven are all yours.
But what if you want more than that? Or what if you want to configure a block of text that uses multiple lines. While there are ways to do it with parameters, there's a better way altogether: Configuration Profiles.
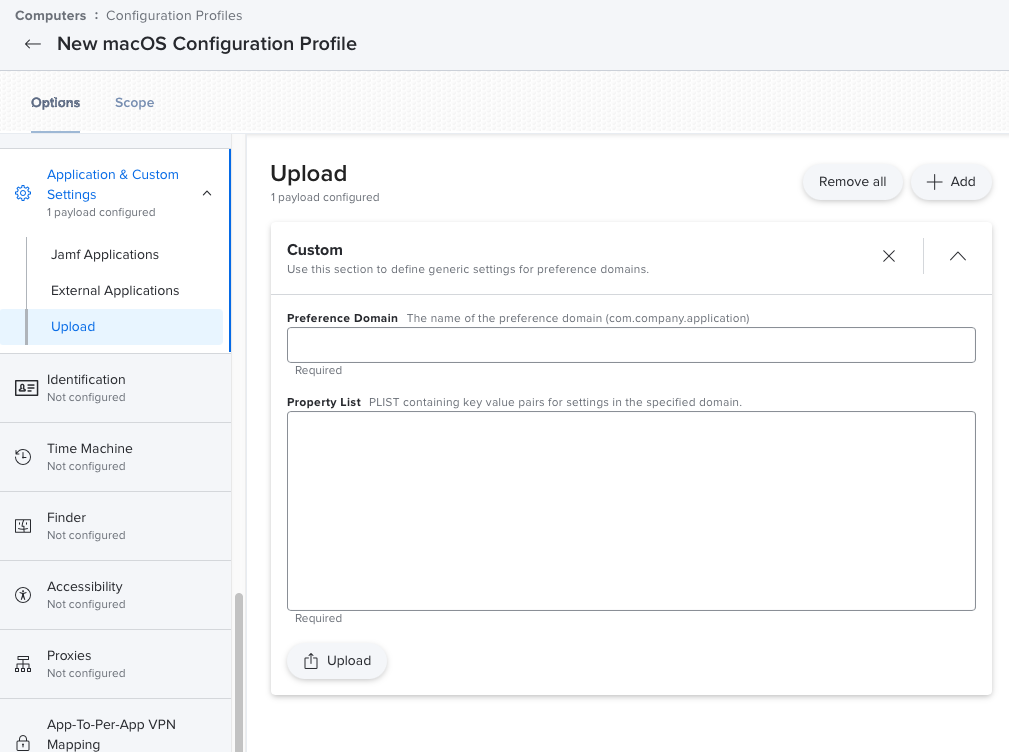
By creating a configuration profile with the "Application & Custom Settings" payload and selecting "Upload" you can create a plist file that, once deployed, can be read by a policy script.
Consider the following plist file:
<plist version="1.0">
<dict>
	<key>LaunchCode</key>
	<string>CPE-1704-TKS</string>
	<key>myID</key>
	<string>$JSSID</string>
	<key>UDID</key>
	<string>$UDID</string>
	<key>computerID</key>
	<string>$JSSID</string>
	<key>Jeffsum Text</key>
	<string>
My dad once told me, laugh and the world laughs with you, Cry, and I'll give you something to cry about you little bastard! Do you have any idea how long it takes those cups to decompose. Yeah, but John, if The Pirates of the Caribbean breaks down, the pirates don’t eat the tourists.

Jaguar shark! So tell me - does it really exist? Just my luck, no ice. God creates dinosaurs. God destroys dinosaurs. God creates Man. Man destroys God. Man creates Dinosaurs. Eventually, you do plan to have dinosaurs on your dinosaur tour, right? You really think you can fly that thing? This thing comes fully loaded. AM/FM radio, reclining bucket seats, and... power windows.

Yeah, but your scientists were so preoccupied with whether or not they could, they didn't stop to think if they should. Remind me to thank John for a lovely weekend. What do they got in there? King Kong? Just my luck, no ice. What do they got in there? King Kong?
</string>
</dict>
</plist>
Now inside a script, I can get that information like this:
#!/bin/bash

PLIST="/Library/Managed Preferences/tech.rocketman.prefs.plist"
if [[ -f "${PLIST}" ]]; then
	## File exists. Let's load in some variables
	JeffsumText=$(defaults read "${PLIST}" "Jeffsum Text")
	computerID=$(defaults read "${PLIST}" computerID)
fi
And like in the example above with computerID, this can include any of the variables that jamf provides. This includes getting things like the computer's ID in Jamf without having to make an API call first.
I've seen plenty of people temporarily store sensitive information inside plain-text and/or plist files. I'm guilty of it myself. When I've done it, I've made sure to put the file someplace that only root/admins can get to and restricted the access to the file, but it's still not a great long-term solution.
So what is?
Since the beginning of macOS, there has always been a really good command line tool for encrypting/decrypting information: openssl. So I'm surprised I didn't think to use it earlier?
Oh yeah! That's because even with a decent understand of cryptography, it's still far from intuitive. In short, if I want to encrypt an entire file using the command:
#!/bin/bash

## Files and Key
PLAIN="/tmp/plaintext.txt"
CIPHER="/tmp/ciphertext.txt"
KEY="SuperSecretEncryptionKey"

## Encrypt the file
openssl enc -aes256 -e -base64 -k "${KEY}" -in "${PLAIN}" -out "${CIPHER}"
cat ${CIPHER}

## Decrypt the file
openssl enc -aes256 -d -base64 -k "${KEY}" -in "${CIPHER}" -out "${PLAIN}"
cat ${PLAIN}
Where "-aes256" is the cipher being used and "-base64" keeps the encrypted file in a human-readable format that can be sent safely through email or other channels.
If you don't want to encrypt an entire file, you can just protect individual pieces like inside a plist file. For example:
#!/bin/bash

PLIST="/Library/Preferences/com.pretendco.localprefs.plist"
KEYSTORE="/Library/Managed Preferences/com.pretendco.managed.plist"
KEYNAME="SuperSecretKey"

## Make sure the key exists
if [[ -f "${KEYSTORE}" ]]; then
	secretKey=$(defaults read "${KEYSTORE} ${KEYNAME}")
else
	echo "Decryption key is missing!"
	exit 1
fi

## Get the old secret
ciphertext=$(defaults read "${PLIST}" SecureData)

## Decrypt the string so we can use it
plaintext=$(echo ${ciphertext} | openssl enc -aes256 -d -base64 -k "${secretKey}")
In this example, a configuration profile (KEYSTORE) contains the a key/value pair of "SuperSecretKey" which points to the key used to encrypt and decrypt the data securely stored in the plist file (PLIST) but only that one field in the plist file is encrypted. The rest of the plist can be plaintext.
These examples all use "secret key cryptography," meaning that the same key is used for both encryption and decryption. Openssl also support "public key cryptography" where there are two keys: 1. the public key which can be freely distributed and is used to encrypt information to be sent and 2. the private key which only the receiver has and can be used to decrypt the data.
So far, I've only briefly tinkered with having the public key distributed in a configuration profile so that secrets can be stored locally on the computer in a plist (or other storage method) and have an Extension Attribute that has the private key and decrpyts and stores the information in Jamf.
And yet there is another option for storing sensative data. One that is built into the operating system and already secures our application, web, and wifi passwords:
The Keychain.
There are command line tools that allow us to create and retrieve data from the keychain.
Here are a few examples of storing, retreiving, updating, and removing information from the keychain:
#!/bin/bash

## Pretend we used AppleScript or some other tool to prompt the user
## for a username/password combo that we need to store for a little while.
SHORTNAME="joshua"
PASSWORD="Double"
KEYCHAIN="/Library/Keychains/System.keychain"
SERVICE="Custom Script"

## Store the password in the keychain
security add-generic-password -a "${SHORTNAME}" -s "${SERVICE}" -w "${PASSWORD}" -A "${KEYCHAIN}" 2>/

## Now let's get it back
foundPassword=$(security find-generic-password -w -a "${SHORTNAME}" -s "${SERVICE}" "${KEYCHAIN}" 2>/dev/null)

## Later we need to change it for some reason
NEWPASSWORD="Pencil"
security delete-generic-password -a "${SHORTNAME}" -s "${SERVICE}" "${KEYCHAIN}" &>/dev/null
security add-generic-password -a "${SHORTNAME}" -s "${SERVICE}" -w "${NEWPASSWORD}" -A "${KEYCHAIN}" 2>/

## Finally, we can delete it
security delete-generic-password -a "${SHORTNAME}" -s "${SERVICE}" "${KEYCHAIN}" &>/dev/null
But wait a minute?! Why are we deleting and re-adding the item instead of just updating it? The add-generic-password command has an update option!
-U Update item if it already exists (if omitted, the item cannot already exist)In my, albeit brief experimentation, any attempt to update the item prompted the user to authenticate before it would proceed. The only way I found to do it silently was to delete and recreate the item.
Well I don't have any single place to use all these techniques together, but one of my examples above demonstrated how you could combine configuration profiles and cryptography to securely store information. I'm sure there are other ideas.
If you have one, please add a note below. I'd love to hear it.